为什么使用Spring Boot? Spring Boot是Spring框架的一个扩展,旨在简化Spring应用的初始搭建和开发过程。它通过提供开箱即用的组件、自动化配置和快速启动等特性,极大地提高了开发效率和应用性能。以下是使用Spring Boot的主要原因:
简化开发
Spring Boot提供了很多开箱即用的组件和自动化配置,使得开发人员能够更加关注于程序的开发设计,而不必花费大量时间在繁琐的部署和配置上。
主要特性:
约定优于配置 :Spring Boot遵循“约定优于配置”的原则,通过默认配置减少了开发人员的配置工作。内嵌服务器 :Spring Boot内嵌了Tomcat、Jetty等服务器,无需手动部署WAR文件。依赖管理 :Spring Boot通过spring-boot-starter依赖,简化了依赖管理,减少了版本冲突问题。
快速启动
Spring Boot提供了快速的程序应用启动方式,使得开发人员能够快速验证和迭代代码。
主要特性:
快速启动 :Spring Boot应用启动速度快,通常只需几秒钟即可启动。热部署 :Spring Boot支持热部署,开发人员可以在不重启应用的情况下修改代码并立即看到效果。
自动化配置
Spring Boot通过自动配置功能,根据项目中的依赖和约定俗成的规则来配置程序,减少了配置的复杂性。
主要特性:
自动配置 :Spring Boot根据项目中的依赖自动配置应用,减少了手动配置的工作量。条件化配置 :Spring Boot支持条件化配置,根据环境、配置文件等条件自动选择合适的配置。
强大的生态系统
Spring Boot构建在Spring框架之上,继承了Spring的强大生态系统,提供了丰富的扩展和集成支持。
主要特性:
Spring Data :简化数据库访问和操作。Spring Security :提供安全认证和授权功能。Spring Cloud :支持微服务架构,提供服务发现、配置管理、断路器等功能。
Spring Boot 采用的设计模式 Spring Boot作为Spring框架的扩展,继承了Spring框架中广泛使用的设计模式。这些设计模式不仅提高了代码的可维护性和可扩展性,还使得Spring Boot能够灵活应对各种复杂的应用场景。以下是Spring Boot中常用的一些设计模式及其应用:
1. 单例模式(Singleton Pattern)
应用场景 :Spring Bean默认是单例模式。
特点 :在整个应用中,每个Bean定义只会创建一个实例,并将其缓存起来,供多个用户共享。
1
2
3
4
@Component public class MySingletonBean { }
2. 模板模式(Template Pattern)
应用场景 :Spring Bean的创建过程设计模板模式,体现扩展性,类似Callback回调实现方式。
特点 :模板模式定义了一个算法的骨架,并允许子类在不改变算法结构的情况下重新定义算法的某些步骤。
1
2
3
4
5
6
7
8
9
10
11
12
13
14
15
16
17
18
19
20
21
public abstract class AbstractTemplate { public void execute () { step1(); step2(); } protected abstract void step1 () ; protected abstract void step2 () ; } public class ConcreteTemplate extends AbstractTemplate { @Override protected void step1 () { } @Override protected void step2 () { } }
3.简单工厂模式(Simple Factory Pattern)
应用场景 :Spring中BeanFactory是简单工厂模式的体现,类似工厂类方法获取Bean实例。
特点 :简单工厂模式通过一个工厂类来创建不同类型的对象,客户端无需知道具体的创建逻辑。
1
2
3
4
5
6
7
8
9
10
public class BeanFactory { public static Object getBean (String beanName) { if ("myBean" .equals(beanName)) { return new MyBean (); } else if ("anotherBean" .equals(beanName)) { return new AnotherBean (); } return null ; } }
4.工厂模式(Factory Method Pattern)
应用场景 :Spring中FactoryBean体现工厂方法模式,为不同产品提供不同的工厂。
特点 :工厂方法模式定义了一个创建对象的接口,但由子类决定实例化哪个类。
1
2
3
4
5
6
7
8
9
10
11
12
13
14
15
16
17
18
19
20
21
22
public interface FactoryBean <T> { T getObject () throws Exception; Class<?> getObjectType(); boolean isSingleton () ; } public class MyFactoryBean implements FactoryBean <MyBean> { @Override public MyBean getObject () throws Exception { return new MyBean (); } @Override public Class<?> getObjectType() { return MyBean.class; } @Override public boolean isSingleton () { return true ; } }
5.代理模式(Proxy Pattern)
应用场景 :Spring AOP中动态代理主要通过代理模式实现。
特点 :代理模式为其他对象提供一种代理以控制对这个对象的访问。
1
2
3
4
5
6
7
8
9
10
11
12
13
14
15
16
17
18
19
20
21
22
23
24
25
public interface MyService { void doSomething () ; } public class MyServiceImpl implements MyService { @Override public void doSomething () { } } public class MyServiceProxy implements MyService { private MyService target; public MyServiceProxy (MyService target) { this .target = target; } @Override public void doSomething () { target.doSomething(); } }
6.观察者模式(Observer Pattern)
应用场景 :Spring的事件机制(ApplicationEvent)体现了观察者模式。
特点 :观察者模式定义了一种一对多的依赖关系,当一个对象的状态发生改变时,所有依赖于它的对象都得到通知并被自动更新。
1
2
3
4
5
6
7
8
9
10
11
12
13
public class MyEvent extends ApplicationEvent { public MyEvent (Object source) { super (source); } } @Component public class MyEventListener implements ApplicationListener <MyEvent> { @Override public void onApplicationEvent (MyEvent event) { } }
7.策略模式(Strategy Pattern)
应用场景 :Spring AOP的动态代理通过两种不同的动态代理实现(JDK动态代理和CGLIB动态代理),通过不同的策略接口和不同策略类,在运行时动态选择。
特点 :策略模式定义了一系列算法,并将每个算法封装起来,使它们可以互换。
1
2
3
4
5
6
7
8
9
10
11
12
13
14
15
16
17
public interface PaymentStrategy { void pay (double amount) ; } public class CreditCardPayment implements PaymentStrategy { @Override public void pay (double amount) { } } public class PayPalPayment implements PaymentStrategy { @Override public void pay (double amount) { } }
8.适配器模式(Adapter Pattern)
应用场景 :Spring MVC针对不同方式定义的Controller,利用适配器模式统一函数定义,定义了统一接口HandlerAdapter及其对应的适配器类。
特点 :适配器模式将一个类的接口转换成客户端所期望的另一个接口。
1
2
3
4
5
6
7
8
9
10
11
12
13
14
15
16
public interface HandlerAdapter { boolean supports (Object handler) ; ModelAndView handle (HttpServletRequest request, HttpServletResponse response, Object handler) throws Exception; } public class SimpleControllerHandlerAdapter implements HandlerAdapter { @Override public boolean supports (Object handler) { return (handler instanceof Controller); } @Override public ModelAndView handle (HttpServletRequest request, HttpServletResponse response, Object handler) throws Exception { return ((Controller) handler).handleRequest(request, response); } }
9.装饰器模式(Decorator Pattern)
应用场景 :Spring Security中通过装饰器模式对请求进行安全处理。
特点 :装饰器模式动态地给一个对象添加一些额外的职责,而不改变其结构。
1
2
3
4
5
6
7
8
9
10
11
12
13
14
15
16
17
public interface Filter { void doFilter (ServletRequest request, ServletResponse response, FilterChain chain) throws IOException, ServletException; } public class AuthenticationFilter implements Filter { private Filter delegate; public AuthenticationFilter (Filter delegate) { this .delegate = delegate; } @Override public void doFilter (ServletRequest request, ServletResponse response, FilterChain chain) throws IOException, ServletException { delegate.doFilter(request, response, chain); } }
Spring Boot 的“约定大于配置” Spring Boot中的“约定大于配置”原则是一种设计理念,旨在通过减少配置和提供合理的默认值,使得开发者可以更快速地构建和部署应用程序,同时降低入门门槛和维护成本。以下是对这一原则的详细解释及其在Spring Boot中的实现方式。
自动化配置
Spring Boot通过自动化配置功能,根据项目的依赖和环境自动配置应用程序的行为。开发者无需手动配置大量的XML文件或Java配置类,Spring Boot会根据约定自动完成大部分配置。
主要特性:
自动配置类 :Spring Boot提供了大量的自动配置类,这些类根据项目的依赖自动配置应用程序的行为。条件化配置 :Spring Boot支持条件化配置,根据环境、配置文件等条件自动选择合适的配置。
默认配置
Spring Boot在没有明确配置的情况下,会使用合理的默认值来初始化应用程序。这些默认值通常是经过精心设计的,能够满足大多数应用场景的需求。
主要特性:
默认端口 :Spring Boot默认使用8080端口启动Web应用。默认数据源 :Spring Boot默认配置HikariCP作为数据库连接池。默认日志配置 :Spring Boot默认使用Logback作为日志框架。
示例代码
1
2
3
4
5
6
7
8
server: port: 8080 spring: datasource: url: jdbc:mysql://localhost:3306/mydb username: root password: root
约定优于配置
Spring Boot遵守“约定优于配置”的设计哲学,即通过约定好的方式来提供默认行为,减少开发者所需要做出的决策。开发者只需遵循Spring Boot的约定,即可快速构建应用程序。
主要特性:
包结构约定 :Spring Boot默认扫描主类所在包及其子包中的组件。配置文件约定 :Spring Boot默认加载application.properties或application.yml配置文件。静态资源约定 :Spring Boot默认将src/main/resources/static目录下的文件作为静态资源。
起步依赖
Spring Boot提供了一系列起步依赖(Starter Dependencies),这些依赖包含了常用的框架功能,可以帮助开发者快速搭建项目。起步依赖通过Maven或Gradle管理,简化了依赖配置。
主要特性:
简化依赖管理 :起步依赖包含了常用框架的依赖,减少了手动配置的工作量。版本管理 :起步依赖统一管理依赖版本,避免了版本冲突问题。
示例代码
1 2 3 4 5 6 7 8 9 10 <dependencies > <dependency > <groupId > org.springframework.boot</groupId > <artifactId > spring-boot-starter-web</artifactId > </dependency > <dependency > <groupId > org.springframework.boot</groupId > <artifactId > spring-boot-starter-data-jpa</artifactId > </dependency > </dependencies >
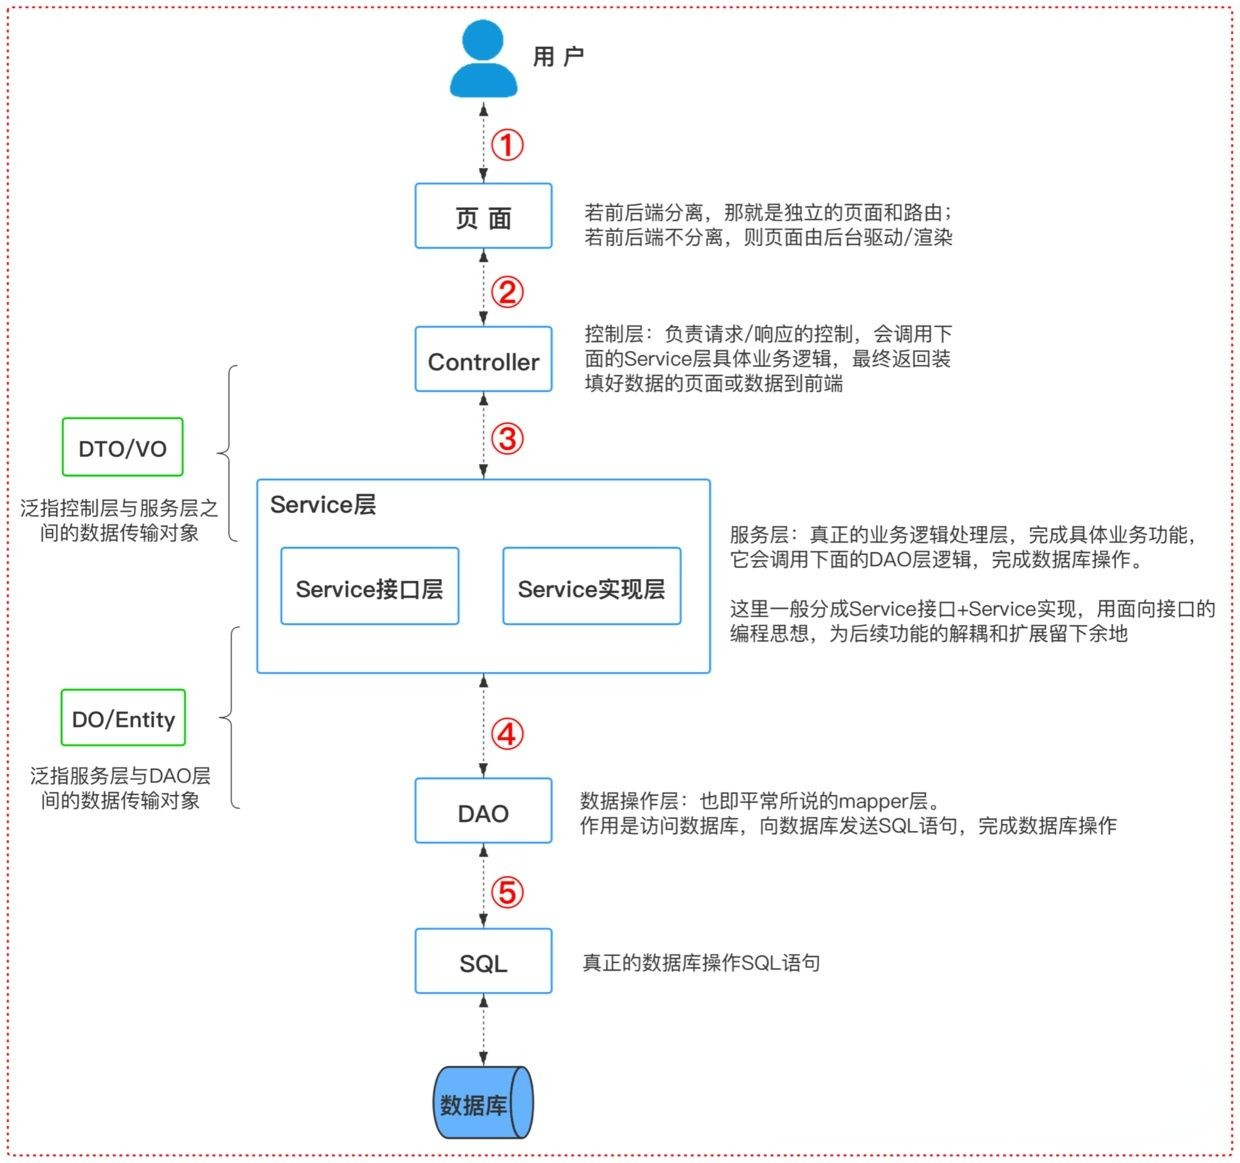
Spring Boot 项目结构 在Spring Boot项目中,合理的项目结构和代码层级划分对于项目的可维护性和可扩展性至关重要。虽然不同的企业可能会有内部通用的项目结构和代码层级划分指导意见,但以下结构是基于《阿里巴巴Java开发手册》的一个典型示例,适用于大多数Spring Boot项目。
开放接口层(Controller层) :可直接封装Service接口暴露成RPC接口;通过Web封装成HTTP接口;网关控制层等。
终端显示层(View层) :各个终端的模板渲染并执行显示的层。
Web层 :主要是对访问控制进行转发,包括对请求参数的校验、请求的转发、请求的过滤等。
Service层 :相对具体的逻辑业务层,负责处理具体的业务逻辑。
Manager层 :通用业务处理层,包括对第三方服务的封装、对复杂业务逻辑的拆分等。
DAO层 :数据库访问层,与具体的数据库进行交互,负责数据的增删改查操作。
第三方服务层 :包括其他部门的RPC服务接口、基础平台、其他公司的HTTP接口等。
外部数据接口 :处理与外部系统或服务的交互,如调用外部API、处理外部数据等。
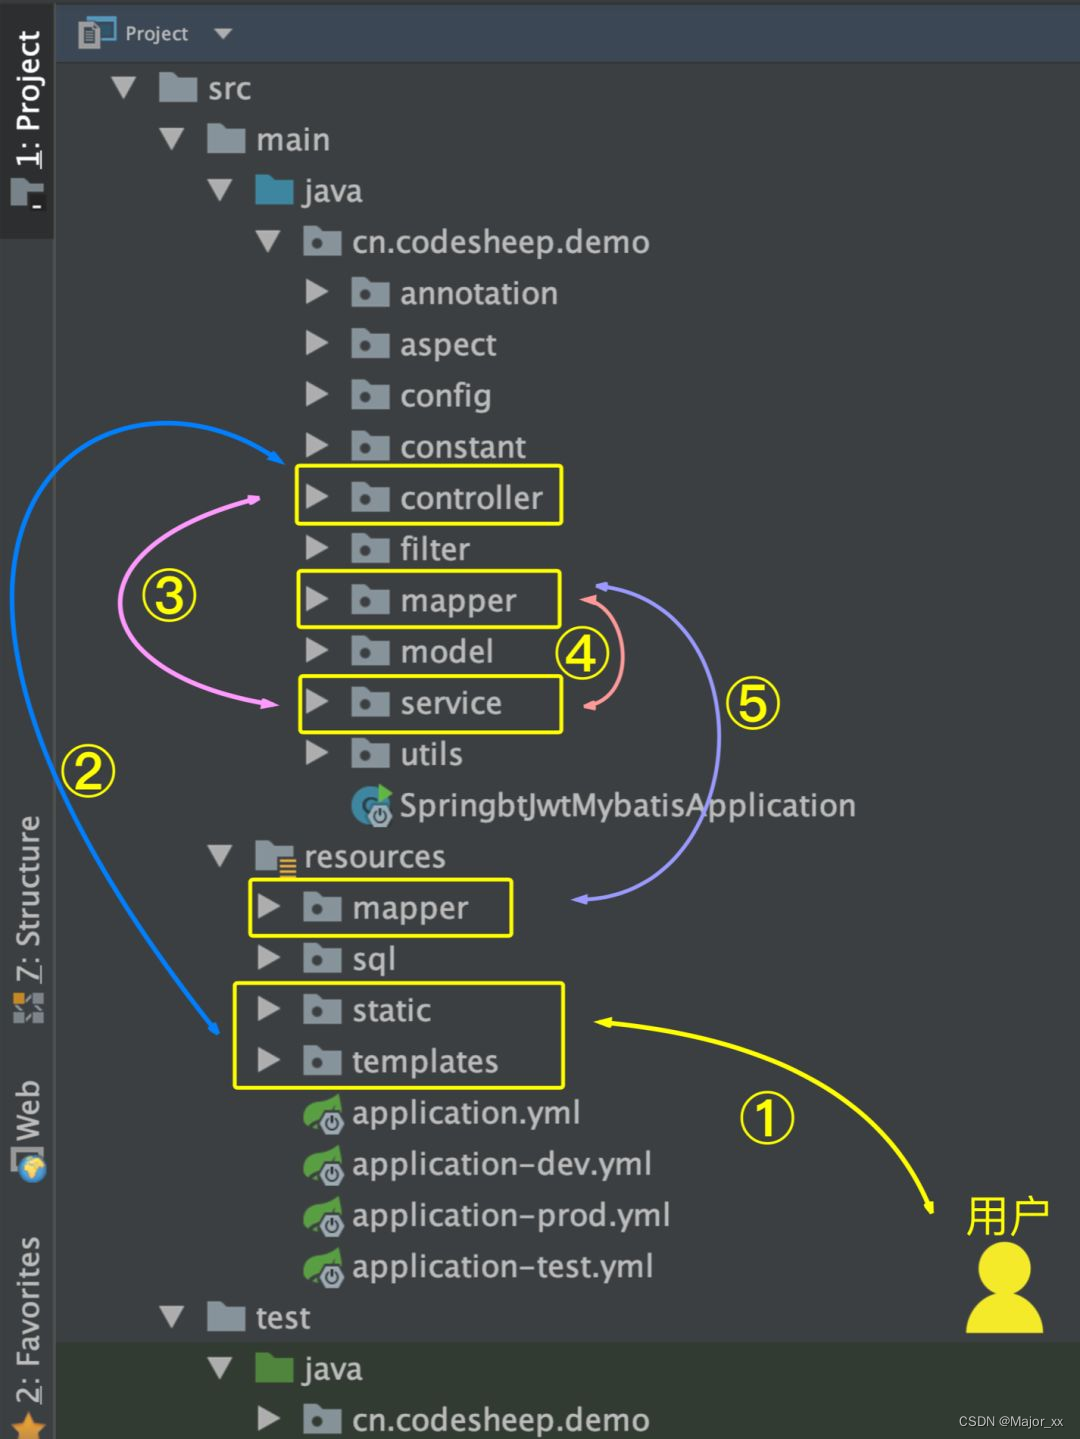
假设有一个用户与系统发生交互,其逻辑流程如下图:
代码目录流转逻辑如下:
Spring Boot 自动装配原理 什么是自动装配 Spring Boot的自动装配是通过Spring Framework的@EnableAutoConfiguration注解实现的。这种机制允许开发者在项目中引入相关的依赖,Spring Boot根据这些依赖自动配置应用程序的上下文和功能。自动装配极大地简化了配置过程,使得开发者能够更快速地构建和部署应用程序。
Spring Boot配置了一套接口规范,这套规范规定:Spring Boot在启动时会扫描外部引用jar包中的META-INF/spring.factories文件,将文件中的配置类型信息加载到Spring容器,并执行类中定义的各种操作。对于外部jar来说,只需要按照Spring Boot定义的标准,就能将自己的功能装配到Spring Boot。
通俗一点讲,就是在Spring Boot中只需要通过注解或者一些简单的配置,就可以开启和配置各种功能,比如数据库访问等。
Spring Boot 自动装配原理 1.@EnableAutoConfiguration注解
@EnableAutoConfiguration是Spring Boot自动装配的核心注解。它通过@Import注解引入了一个AutoConfigurationImportSelector类,该类负责扫描并加载自动配置类。
1
2
3
4
5
6
7
8
9
10
11
@Target(ElementType.TYPE) @Retention(RetentionPolicy.RUNTIME) @Documented @Inherited @AutoConfigurationPackage @Import(AutoConfigurationImportSelector.class) public @interface EnableAutoConfiguration { String ENABLED_OVERRIDE_PROPERTY = "spring.boot.enableautoconfiguration" ; Class<?>[] exclude() default {}; String[] excludeName() default {}; }
2.AutoConfigurationImportSelector类
AutoConfigurationImportSelector类实现了DeferredImportSelector接口,它会在Spring Boot启动时被调用,负责加载自动配置类。
1
2
3
4
5
6
7
8
9
10
11
12
13
14
15
16
17
18
19
20
21
public class AutoConfigurationImportSelector implements DeferredImportSelector , BeanClassLoaderAware, ResourceLoaderAware, BeanFactoryAware, EnvironmentAware, Ordered { @Override public String[] selectImports(AnnotationMetadata annotationMetadata) { List<String> configurations = getCandidateConfigurations(annotationMetadata, attributes); configurations = removeDuplicates(configurations); configurations = sort(configurations); return configurations.toArray(new String [configurations.size()]); } protected List<String> getCandidateConfigurations (AnnotationMetadata metadata, AnnotationAttributes attributes) { List<String> configurations = SpringFactoriesLoader.loadFactoryNames(getSpringFactoriesLoaderFactoryClass(), getBeanClassLoader()); return configurations; } }
3.META-INF/spring.factories文件
META-INF/spring.factories文件是Spring Boot自动装配的关键配置文件。它定义了需要自动配置的类列表。
1 2 3 org.springframework.boot.autoconfigure.EnableAutoConfiguration =\ com.example.autoconfigure.MyAutoConfiguration
4.自动配置类
自动配置类通常使用@Configuration注解,并根据条件进行配置。Spring Boot提供了多种条件注解,如@ConditionalOnClass、@ConditionalOnProperty等,用于根据类路径、配置属性等条件决定是否加载配置。
1
2
3
4
5
6
7
8
9
10
11
@Configuration @ConditionalOnClass(MyService.class) @EnableConfigurationProperties(MyProperties.class) public class MyAutoConfiguration { @Bean @ConditionalOnMissingBean public MyService myService (MyProperties properties) { return new MyService (properties); } }
自动装配的流程
启动Spring Boot应用 :Spring Boot应用启动时,会扫描主类上的@SpringBootApplication注解。加载@EnableAutoConfiguration注解 :@SpringBootApplication注解包含了@EnableAutoConfiguration注解,触发自动装配机制。加载AutoConfigurationImportSelector类 :@EnableAutoConfiguration注解通过@Import注解引入AutoConfigurationImportSelector类。扫描META-INF/spring.factories文件 :AutoConfigurationImportSelector类通过SpringFactoriesLoader扫描所有jar包中的META-INF/spring.factories文件,加载自动配置类。加载自动配置类 :根据META-INF/spring.factories文件中的配置,加载并实例化自动配置类。条件化配置 :自动配置类根据条件注解(如@ConditionalOnClass、@ConditionalOnProperty等)决定是否生效。注册Bean :符合条件的自动配置类中的Bean被注册到Spring容器中。
Spring Boot 启动器 Spring Boot 启动器(Starter) Spring Boot 启动器(Starter)是一组预配置的依赖集合,旨在简化Spring Boot应用程序的依赖管理和配置过程。每个启动器都包含了特定功能所需的所有依赖项,开发者只需引入相应的启动器,即可快速集成和使用该功能。以下是一些常见的Spring Boot启动器及其用途:
spring-boot-starter-web :最常用的起步依赖之一,包含了Spring MVC和Tomcat嵌入式服务器。适用于构建Web应用程序和RESTful服务。
1 2 3 4 <dependency > <groupId > org.springframework.boot</groupId > <artifactId > spring-boot-starter-web</artifactId > </dependency >
spring-boot-starter-security :提供了Spring Security的基本配置,帮助开发者快速实现应用的权限控制。
1 2 3 4 <dependency > <groupId > org.springframework.boot</groupId > <artifactId > spring-boot-starter-security</artifactId > </dependency >
mybatis-spring-boot-starter :由MyBatis团队提供的启动器,用于简化MyBatis在Spring Boot中的集成过程。
1 2 3 4 5 <dependency > <groupId > org.mybatis.spring.boot</groupId > <artifactId > mybatis-spring-boot-starter</artifactId > <version > 2.1.4</version > </dependency >
spring-boot-starter-data-jpa / spring-boot-starter-jdbc :这两个启动器都是为了方便项目对数据库进行操作。前者用于集成Spring Data JPA,后者用于集成Spring JDBC。
1 2 3 4 5 6 7 8 9 10 11 <dependency > <groupId > org.springframework.boot</groupId > <artifactId > spring-boot-starter-data-jpa</artifactId > </dependency > <dependency > <groupId > org.springframework.boot</groupId > <artifactId > spring-boot-starter-jdbc</artifactId > </dependency >
spring-boot-starter-data-redis :用于集成Redis缓存和数据库存储服务。包含了与Redis交互的客户端(默认是Jedis),以及Spring Data Redis的支持。
1 2 3 4 <dependency > <groupId > org.springframework.boot</groupId > <artifactId > spring-boot-starter-data-redis</artifactId > </dependency >
spring-boot-starter-test :包含了用于单元测试或集成测试所需要的库,如JUnit、Spring Test等,便于进行测试驱动开发(TDD)。
1 2 3 4 5 <dependency > <groupId > org.springframework.boot</groupId > <artifactId > spring-boot-starter-test</artifactId > <scope > test</scope > </dependency >
Spring Starter 创建过程 创建一个Spring Boot Starter的过程涉及多个步骤,包括创建Maven项目、添加自动化配置、创建配置属性类、创建服务和控制器、发布Starter以及在主应用中使用Starter。以下是详细的步骤说明:
第一步:创建Maven项目 首先需要创建一个新的Maven项目。在pom.xml中添加Spring Boot的starter parent和一些必要的依赖。
1 2 3 4 5 6 7 8 9 10 11 12 13 14 15 16 17 18 19 20 21 22 23 24 25 26 27 28 29 30 31 32 33 34 35 36 37 <project xmlns ="http://maven.apache.org/POM/4.0.0" xmlns:xsi ="http://www.w3.org/2001/XMLSchema-instance" xsi:schemaLocation ="http://maven.apache.org/POM/4.0.0 http://maven.apache.org/xsd/maven-4.0.0.xsd" > <modelVersion > 4.0.0</modelVersion > <groupId > com.example</groupId > <artifactId > my-spring-boot-starter</artifactId > <version > 1.0.0</version > <parent > <groupId > org.springframework.boot</groupId > <artifactId > spring-boot-starter-parent</artifactId > <version > 2.5.4</version > <relativePath /> </parent > <dependencies > <dependency > <groupId > org.springframework.boot</groupId > <artifactId > spring-boot-starter</artifactId > </dependency > <dependency > <groupId > org.springframework.boot</groupId > <artifactId > spring-boot-configuration-processor</artifactId > <optional > true</optional > </dependency > </dependencies > <build > <plugins > <plugin > <groupId > org.springframework.boot</groupId > <artifactId > spring-boot-maven-plugin</artifactId > </plugin > </plugins > </build > </project >
第二步:添加自动化配置 在src/main/resources/META-INF/spring.factories中添加自动配置的元数据。
1
2
org.springframework.boot.autoconfigure.EnableAutoConfiguration =\ com.example.MyAutoConfiguration
然后,创建MyAutoConfiguration类,该类需要@Configuration和@EnableConfigurationProperties注解。
1
2
3
4
5
6
7
8
9
10
11
12
13
14
15
16
17
package com.example;import org.springframework.boot.autoconfigure.condition.ConditionalOnClass;import org.springframework.boot.context.properties.EnableConfigurationProperties;import org.springframework.context.annotation.Bean;import org.springframework.context.annotation.Configuration;@Configuration @ConditionalOnClass(MyService.class) @EnableConfigurationProperties(MyProperties.class) public class MyAutoConfiguration { @Bean public MyService myService (MyProperties properties) { return new MyService (properties); } }
第三步:创建配置属性类 创建一个配置属性类,使用@ConfigurationProperties注解来绑定配置文件中的属性。
1
2
3
4
5
6
7
8
9
10
11
12
13
14
15
16
package com.example;import org.springframework.boot.context.properties.ConfigurationProperties;@ConfigurationProperties(prefix = "my") public class MyProperties { private String name; public String getName () { return name; } public void setName (String name) { this .name = name; } }
第四步:创建服务和控制器 创建一个服务类和服务实现类,以及一个控制器来展示starter的功能。
1
2
3
4
5
6
7
8
9
10
11
12
13
14
15
16
17
18
19
20
21
22
23
24
25
26
27
28
29
30
31
package com.example;public class MyService { private final MyProperties properties; public MyService (MyProperties properties) { this .properties = properties; } public String getName () { return properties.getName(); } } package com.example;import org.springframework.beans.factory.annotation.Autowired;import org.springframework.web.bind.annotation.GetMapping;import org.springframework.web.bind.annotation.RestController;@RestController public class MyController { @Autowired private MyService myService; @GetMapping("/name") public String getName () { return myService.getName(); } }
第五步:发布Starter 将starter发布到Maven仓库,无论是私有的还是共有的,如Maven Central。
1
2
mvn clean install mvn deploy
第六步:使用starter 在主应用的pom.xml中添加依赖,然后在application.properties或者application.yml中配置属性。
1 2 3 4 5 <dependency > <groupId > com.example</groupId > <artifactId > my-spring-boot-starter</artifactId > <version > 1.0.0</version > </dependency >
1 my.name =Spring Boot Starter Example
Spring Boot 注解 Spring Boot 提供了丰富的注解,用于简化配置和开发过程。以下是一些常用的Spring Boot注解及其用途:
1.@SpringBootApplication
用于标记主应用程序类,标识一个Spring Boot应用程序的入口点,同时启用自动配置和组件扫描。
1
2
3
4
5
6
7
8
9
import org.springframework.boot.SpringApplication;import org.springframework.boot.autoconfigure.SpringBootApplication;@SpringBootApplication public class MyApplication { public static void main (String[] args) { SpringApplication.run(MyApplication.class, args); } }
2.@Controller
标识控制器,处理HTTP请求。
1
2
3
4
5
6
7
8
9
10
11
12
13
import org.springframework.stereotype.Controller;import org.springframework.web.bind.annotation.GetMapping;import org.springframework.web.bind.annotation.ResponseBody;@Controller public class MyController { @GetMapping("/hello") @ResponseBody public String hello () { return "Hello, World!" ; } }
3.@RestController
结合@Controller和@ResponseBody,返回RESTful风格的数据。
1
2
3
4
5
6
7
8
9
10
11
import org.springframework.web.bind.annotation.GetMapping;import org.springframework.web.bind.annotation.RestController;@RestController public class MyRestController { @GetMapping("/hello") public String hello () { return "Hello, World!" ; } }
4.@Service
标识服务类,用于标记业务逻辑层。
1
2
3
4
5
6
7
8
9
import org.springframework.stereotype.Service;@Service public class MyService { public String getMessage () { return "Hello from Service!" ; } }
5.@Repository
标识数据访问组件。
1
2
3
4
5
6
7
8
9
import org.springframework.stereotype.Repository;@Repository public class MyRepository { public String getData () { return "Data from Repository!" ; } }
6.@Component
通用Spring组件注解,表示一个受Spring容器管理的组件。
1
2
3
4
5
6
7
8
9
import org.springframework.stereotype.Component;@Component public class MyComponent { public String getInfo () { return "Info from Component!" ; } }
7.@Autowired
用于自动装配的注解。
1
2
3
4
5
6
7
8
9
10
11
12
13
import org.springframework.beans.factory.annotation.Autowired;import org.springframework.stereotype.Service;@Service public class MyService { @Autowired private MyRepository myRepository; public String getMessage () { return myRepository.getData(); } }
8.@Value
用于标记注入配置属性值。
1
2
3
4
5
6
7
8
9
10
11
12
13
import org.springframework.beans.factory.annotation.Value;import org.springframework.stereotype.Component;@Component public class MyComponent { @Value("${my.property}") private String myProperty; public String getProperty () { return myProperty; } }
9.@RequestMapping
用于映射HTTP请求路径到Controller的处理方法。
1
2
3
4
5
6
7
8
9
10
11
12
13
import org.springframework.web.bind.annotation.RequestMapping;import org.springframework.web.bind.annotation.RequestMethod;import org.springframework.web.bind.annotation.RestController;@RestController @RequestMapping("/api") public class MyController { @RequestMapping(value = "/hello", method = RequestMethod.GET) public String hello () { return "Hello, World!" ; } }
10.@GetMapping、@PostMapping、@PutMapping、@DeleteMapping
简化@RequestMapping的GET、POST、PUT、DELETE请求。
1
2
3
4
5
6
7
8
9
10
11
12
13
14
15
16
17
18
19
20
21
22
23
24
25
26
27
28
29
30
import org.springframework.web.bind.annotation.GetMapping;import org.springframework.web.bind.annotation.PostMapping;import org.springframework.web.bind.annotation.PutMapping;import org.springframework.web.bind.annotation.DeleteMapping;import org.springframework.web.bind.annotation.RestController;@RestController @RequestMapping("/api") public class MyController { @GetMapping("/hello") public String hello () { return "Hello, World!" ; } @PostMapping("/create") public String create () { return "Resource created!" ; } @PutMapping("/update") public String update () { return "Resource updated!" ; } @DeleteMapping("/delete") public String delete () { return "Resource deleted!" ; } }
11.@Configuration
用于标记一个类为配置类,其中定义的Bean会被Spring容器管理。通常与@Bean注解配合使用。
1
2
3
4
5
6
7
8
9
10
11
import org.springframework.context.annotation.Bean;import org.springframework.context.annotation.Configuration;@Configuration public class MyConfig { @Bean public MyService myService () { return new MyService (); } }
Spring Boot 事务 在Spring Boot中,开启事务管理非常简单,主要通过以下几个步骤来实现:
声明式事务 启用事务管理 Spring Boot默认已经启用了事务管理,但你需要确保在你的Spring Boot应用中引入了spring-boot-starter-data-jpa或spring-boot-starter-jdbc等依赖,这些依赖会自动配置事务管理器。
使用@EnableTransactionManagement注解(可选) 在Spring Boot中,通常不需要显式地使用@EnableTransactionManagement注解,因为Spring Boot的自动配置已经启用了事务管理。但如果你需要更细粒度的控制,可以在配置类上使用该注解。
1
2
3
4
5
6
7
8
import org.springframework.context.annotation.Configuration;import org.springframework.transaction.annotation.EnableTransactionManagement;@Configuration @EnableTransactionManagement public class TransactionConfig { }
使用@Transactional注解 在需要开启事务的方法或类上使用@Transactional注解。Spring会自动为这些方法或类开启事务管理。
1
2
3
4
5
6
7
8
9
10
11
12
13
14
15
16
import org.springframework.beans.factory.annotation.Autowired;import org.springframework.stereotype.Service;import org.springframework.transaction.annotation.Transactional;@Service public class UserService { @Autowired private UserRepository userRepository; @Transactional public void createUser (User user) { userRepository.save(user); } }
配置事务管理器(可选) Spring Boot会根据你的数据源自动配置一个事务管理器(如DataSourceTransactionManager)。如果你需要自定义事务管理器,可以在配置类中手动配置。
1
2
3
4
5
6
7
8
9
10
11
12
13
14
15
import org.springframework.context.annotation.Bean;import org.springframework.context.annotation.Configuration;import org.springframework.jdbc.datasource.DataSourceTransactionManager;import org.springframework.transaction.PlatformTransactionManager;import javax.sql.DataSource;@Configuration public class TransactionConfig { @Bean public PlatformTransactionManager transactionManager (DataSource dataSource) { return new DataSourceTransactionManager (dataSource); } }
事务传播行为和隔离级别 你可以通过@Transactional注解的属性来配置事务的传播行为和隔离级别。
1
2
3
4
5
6
import org.springframework.transaction.annotation.Transactional;@Transactional(propagation = Propagation.REQUIRED, isolation = Isolation.READ_COMMITTED) public void createUser (User user) { }
编程式事务 在Spring Boot中,除了使用声明式事务(通过@Transactional注解),你还可以使用编程式事务来更细粒度地控制事务。编程式事务允许你在代码中手动开始、提交或回滚事务。以下是如何在Spring Boot中开启编程式事务的步骤:
首先,你需要注入PlatformTransactionManager,这是Spring管理事务的核心接口。Spring Boot会根据你的数据源自动配置一个默认的事务管理器(如DataSourceTransactionManager)。
1
2
3
4
5
6
7
8
9
10
11
12
13
14
15
16
17
18
19
20
21
22
23
24
25
26
27
28
29
30
31
32
33
34
35
36
37
import org.springframework.beans.factory.annotation.Autowired;import org.springframework.stereotype.Service;import org.springframework.transaction.PlatformTransactionManager;import org.springframework.transaction.TransactionStatus;import org.springframework.transaction.support.DefaultTransactionDefinition;@Service public class UserService { @Autowired private PlatformTransactionManager transactionManager; @Autowired private UserRepository userRepository; public void createUser (User user) { DefaultTransactionDefinition def = new DefaultTransactionDefinition (); def.setName("createUserTransaction" ); def.setPropagationBehavior(TransactionDefinition.PROPAGATION_REQUIRED); TransactionStatus status = transactionManager.getTransaction(def); try { userRepository.save(user); transactionManager.commit(status); } catch (Exception ex) { transactionManager.rollback(status); throw ex; } } }
使用TransactionTemplate TransactionTemplate是Spring提供的一个简化编程式事务的工具类。它封装了事务的开始、提交和回滚操作,使代码更加简洁。
1
2
3
4
5
6
7
8
9
10
11
12
13
14
15
16
17
18
19
20
21
22
23
24
25
26
27
28
29
30
31
import org.springframework.beans.factory.annotation.Autowired;import org.springframework.stereotype.Service;import org.springframework.transaction.PlatformTransactionManager;import org.springframework.transaction.support.TransactionTemplate;@Service public class UserService { private final TransactionTemplate transactionTemplate; @Autowired private UserRepository userRepository; @Autowired public UserService (PlatformTransactionManager transactionManager) { this .transactionTemplate = new TransactionTemplate (transactionManager); } public void createUser (User user) { transactionTemplate.execute(status -> { try { userRepository.save(user); return null ; } catch (Exception ex) { status.setRollbackOnly(); throw ex; } }); } }
